Advanced Techniques in Color Blending for Murals
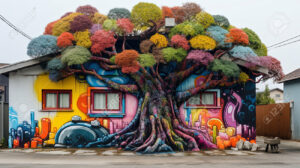
They say that a picture is worth a thousand words, and when it comes to murals, that sentiment couldn’t be more true. If you’re looking to take your mural painting skills to the next level, then you’ve come to the right place.
In this discussion, we will explore advanced techniques in color blending that will elevate your murals from impressive to breathtaking. From understanding color theory to choosing the right palette, layering techniques, gradient effects, brush techniques, and adding depth with highlights and shadows – we will uncover the secrets to creating stunning and seamless color blends that will leave viewers in awe.
So, prepare to embark on a journey of artistic mastery as we unveil the tricks of the trade that will transform your murals into captivating works of art.
Understanding Color Theory
Understanding color theory is essential for mastering color blending techniques in mural painting. By having a solid grasp of color theory, you’ll be able to create harmonious and visually appealing murals that leave a lasting impact on viewers.
Color theory revolves around the understanding of the color wheel and how colors interact with each other. The color wheel consists of primary colors (red, blue, and yellow), secondary colors (orange, green, and purple), and tertiary colors (created by mixing primary and secondary colors). By understanding the relationships between these colors, you can effectively blend and mix different hues to create a wide range of shades and tones.
Another crucial aspect of color theory is understanding color temperature. Colors can be categorized as warm (such as red, orange, and yellow) or cool (such as blue, green, and purple). This knowledge allows you to create different moods and atmospheres in your mural by strategically using warm or cool colors.
Furthermore, understanding complementary colors is vital in color blending. Complementary colors are located directly opposite each other on the color wheel, such as red and green or blue and orange. When used together, complementary colors create a vibrant and eye-catching contrast in your mural.
Choosing the Right Color Palette
Now that you have a solid understanding of color theory, it’s time to explore the process of choosing the perfect color palette for your mural. The right color palette can make or break your artwork, so it’s important to take the time to consider your options.
First, think about the mood or atmosphere you want to create with your mural. Do you want it to be vibrant and energetic, or calm and soothing? Different colors evoke different emotions, so choose colors that align with the overall feel you want to achieve.
Next, consider the location and surroundings of your mural. Take into account the colors that already exist in the space, such as the buildings, landscape, or other artwork. You want your mural to complement and enhance the existing environment, so choose colors that harmonize with the surroundings.
Another factor to consider is the size and scale of your mural. If your mural is large, you may want to opt for a more limited color palette to avoid overwhelming the viewer. On the other hand, if your mural is smaller, you can experiment with a wider range of colors to create visual interest.
Lastly, don’t be afraid to experiment and play around with different color combinations. Use color swatches or online tools to test out different palettes and see how they work together. Remember, choosing the right color palette is an essential part of creating a visually stunning and impactful mural.
Layering Techniques for Smooth Blends
To achieve smooth blends in your mural, utilize layering techniques that create seamless transitions between colors.
Layering involves applying multiple layers of paint in varying degrees of opacity to achieve the desired color and blend. Start by applying a base layer of the lighter color, ensuring it’s fully dry before moving on.
Next, add a layer of the darker color, but instead of fully covering the lighter color, leave some areas exposed. This will create a soft transition between the two colors. Use a soft, dry brush to blend the edges together, smoothing out any harsh lines.
Repeat this process with additional layers of varying opacity to build up the desired depth and blend. Remember to allow each layer to dry before adding the next to prevent smudging or mixing of colors.
Creating Gradient Effects With Glazes
For achieving gradient effects in your murals, consider incorporating glazes into your painting technique. Glazes are translucent layers of paint that can be applied over a base color to create a gradual transition from one color to another. They can be used to create smooth and seamless gradients, adding depth and dimension to your mural.
To create gradient effects with glazes, start by applying a base color to your wall or canvas. This will serve as the starting point for your gradient. Once the base color is dry, mix a glaze by diluting your desired color with a glazing medium. The glazing medium helps to thin the paint and extend its drying time, allowing for better blending.
Next, apply the glaze over the base color using a soft brush or sponge. Start with a light layer of glaze and gradually build up more intense layers to create the desired gradient effect. Blend the glaze gently as you apply it, using smooth and even strokes. This will ensure a seamless transition between colors.
Continue layering and blending the glazes until you achieve the desired gradient effect. Remember to let each layer dry before applying the next one. The more layers you add, the smoother and more gradual the gradient will appear.
Experimenting With Different Brush Techniques
To enhance the visual impact of your mural, explore different brush techniques for creating unique effects. Experimenting with various brush techniques can add depth, texture, and dimension to your artwork.
One technique you can try is stippling, which involves using a stippling brush or lightly tapping the bristles of a regular brush onto the surface to create a stippled effect. This technique is great for adding texture and creating a sense of movement in your mural.
Another technique to consider is dry brushing, where you use a dry brush with very little paint to create a rough and textured appearance. This technique is perfect for adding highlights or creating a weathered look.
Additionally, you can experiment with splattering by loading your brush with paint and flicking it onto the surface of your mural. This technique can add a sense of energy and dynamism to your artwork.
Adding Depth and Dimension With Highlights and Shadows
Explore the technique of adding depth and dimension to your mural through the strategic use of highlights and shadows. By incorporating highlights and shadows into your mural, you can create a more realistic and dynamic appearance.
Highlights are areas of your mural that are exposed to direct light, while shadows are areas that are shielded from light. By carefully applying lighter shades of paint to the areas where light hits your mural, you can create the illusion of depth and bring certain elements forward. On the other hand, by using darker shades in the areas that are in shadow, you can create the illusion of depth by pushing certain elements back.
To achieve a more realistic look, it’s important to observe how light interacts with objects in real life. Consider the direction of your light source and how it affects the objects in your mural. By understanding how light and shadow work together, you can add depth and dimension to your mural, making it more visually captivating.
Remember that highlights and shadows should be used strategically to enhance the overall composition of your mural. Too much or too little contrast can result in a flat and uninteresting appearance. Experiment with different shades and intensities to find the perfect balance that brings your mural to life.
Frequently Asked Questions
How Do I Clean and Maintain My Brushes After Using Them for Color Blending on a Mural?
After using your brushes for color blending on a mural, cleaning and maintaining them is essential.
Start by rinsing the brushes in warm water to remove excess paint.
Then, use a mild soap or brush cleaner to thoroughly clean the bristles.
Gently squeeze out any remaining water and reshape the bristles.
Finally, let the brushes dry completely before storing them.
Regular cleaning and maintenance will help prolong the lifespan of your brushes and ensure optimal blending results.
Can I Use the Same Color Blending Techniques for Both Indoor and Outdoor Murals?
Yes, you can use the same color blending techniques for both indoor and outdoor murals. The key is to choose high-quality paints that are specifically formulated for outdoor use. These paints are designed to withstand the elements and maintain their vibrancy over time.
Additionally, it’s important to consider the lighting conditions in both settings and adjust your color blending techniques accordingly. Experiment with different brushes and blending methods to achieve the desired effect for your mural, whether it’s indoors or outdoors.
Are There Any Specific Color Combinations That Work Best for Creating a Vibrant and Eye-Catching Mural?
When it comes to creating a vibrant and eye-catching mural, there are definitely specific color combinations that work best. Colors like red and yellow, or blue and green, tend to create a strong contrast and catch people’s attention.
Additionally, using complementary colors, like purple and yellow, can create a harmonious and visually appealing effect.
Don’t be afraid to experiment and play around with different color combinations to find what works best for your mural.
What Are Some Common Mistakes to Avoid When Blending Colors on a Mural?
When blending colors on a mural, there are some common mistakes to avoid.
First, make sure not to overmix your colors, as this can result in a muddy appearance.
Additionally, be mindful of using too many contrasting colors, as this can create a chaotic and overwhelming effect.
Lastly, avoid rushing the blending process and take your time to ensure smooth transitions between colors.
Is It Possible to Achieve a Realistic and Three-Dimensional Look on a Mural Using Only Color Blending Techniques, Without Adding Highlights and Shadows?
Yes, it’s possible to achieve a realistic and three-dimensional look on a mural using only color blending techniques, without adding highlights and shadows.
By skillfully blending different shades and tones of colors, you can create depth and dimension on the mural. The key is to carefully observe the subject and understand how light and shadow interact with it.
This will allow you to create the illusion of depth and bring your mural to life.
Conclusion
In conclusion, mastering advanced techniques in color blending for murals requires a solid understanding of color theory. This includes choosing the right color palette and layering techniques for smooth blends. Additionally, creating gradient effects with glazes and experimenting with different brush techniques are important aspects of color blending. Finally, adding depth and dimension with highlights and shadows is crucial to creating visually stunning murals. By implementing these techniques, artists can bring life to any space with their ar check my site twork.
So, keep practicing and exploring different methods to enhance your color blending skills and take your mural art to the next level.