Creating Visual Interest With Textured Wall Finishes
Have you ever walked into a room and immediately felt captivated by the walls? The way they seem to come alive with texture, creating a visual interest that draws you in.
Textured wall finishes have the power to transform any space, adding depth and character that is hard to ignore. But how exactly can you achieve this effect?
In this discussion, we will explore the benefits of textured wall finishes, popular techniques for adding texture, how to choose the right materials, step-by-step application guides, creative design ideas, and tips for maintenance and care.
So, get ready to discover the secrets behind creating visually stunning walls that leave a lasting impression.
Benefits of Textured Wall Finishes
There are several benefits to using textured wall finishes in your home.
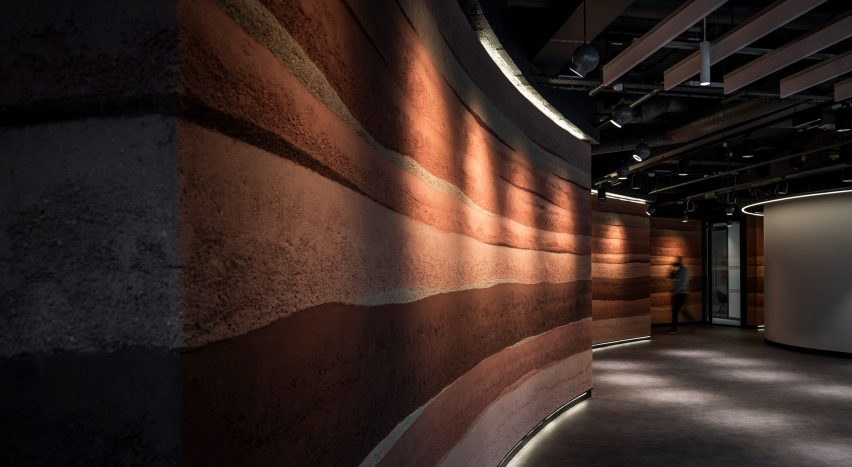
First and foremost, textured wall finishes can add depth and dimension to your walls, creating visual interest and making them more visually appealing. The texture can help to break up the monotony of a plain, smooth wall surface, adding character and personality to your space.
Additionally, textured wall finishes can help to hide imperfections in the walls, such as cracks or uneven surfaces. This can be particularly beneficial if you have an older home or if your walls have suffered wear and tear over time.
Another advantage of textured wall finishes is that they can help to absorb sound, reducing echo and improving the acoustics of a room. This can be especially useful in areas where noise control is important, such as home theaters or bedrooms. The texture on the walls can help to diffuse sound waves, preventing them from bouncing off the walls and creating an echo effect.
Furthermore, textured wall finishes are also more forgiving when it comes to dirt and stains. The texture can help to disguise small marks and smudges, making your walls easier to maintain and keep looking clean. This can be particularly beneficial in high-traffic areas or homes with children or pets.
Popular Techniques for Adding Texture
Now let’s talk about the popular techniques for adding texture to your walls.
There are various texturing techniques that you can use, such as stenciling, sponging, and rag rolling.
To ensure a successful application, make sure to follow these application tips for a smooth and professional finish.
Texturing Techniques
To add texture to your walls, try out these popular techniques:
– Sponging: This technique involves dabbing a sponge into a mixture of paint and glaze, then applying it to your walls in a random pattern. It creates a soft, mottled effect that adds depth and interest.
– Stippling: By using a stippling brush or a sponge, you can create a textured effect by dabbing or stippling paint onto your walls. This technique is great for adding a subtle texture that resembles the look of stucco or plaster.
– Venetian plaster: This technique involves applying multiple layers of plaster and burnishing it to create a smooth, marble-like finish. The result is a rich, luxurious texture that adds elegance to any space.
– Textured wallpaper: If you’re not up for a DIY project, textured wallpaper is a great alternative. It comes in a variety of patterns and textures, allowing you to easily add visual interest to your walls.
With these techniques, you can transform your walls from plain and boring to textured and visually captivating.
Application Tips
For optimal results when applying texture to your walls, follow these application tips for popular techniques.
Firstly, make sure to properly prepare the wall surface by cleaning it and removing any loose or peeling paint. This will ensure a smooth and even application of texture.
Next, choose the right tools for the job. For techniques like stippling or sponging, use a natural sponge or stippling brush to create the desired texture. When applying texture with a trowel, angle it slightly for better control and coverage.
Remember to apply the texture evenly and consistently, avoiding any heavy or uneven areas.
Lastly, allow the texture to dry completely before applying any paint or additional finishes.
Following these tips will help you achieve professional-looking textured wall finishes.
Choosing the Right Materials for Textured Walls
Consider various materials to find the perfect option for creating textured walls. When it comes to choosing the right materials, you have several options to explore. Each material offers its own unique texture and visual appeal, allowing you to create a customized look that suits your style.
Here are four materials to consider:
– Plaster: Plaster is a versatile material that can be applied in various thicknesses to create a range of textures, from smooth to rough. It can be tinted or painted to achieve the desired color and finish.
– Brick: Using brick can add a rustic and industrial feel to your walls. The natural texture and color variations in brick create visual interest and depth. You can choose from different sizes and styles of brick to achieve the desired look.
– Wood: Wood panels or planks can bring warmth and a natural element to your textured walls. The grain and texture of the wood add visual appeal and can be enhanced with different finishes, such as staining or painting.
– Stone: Stone veneer or natural stone can create a striking and sophisticated textured wall. The varied shapes, sizes, and colors of stones offer endless design possibilities. Stone can be used to create a feature wall or to add texture to specific areas.
Step-by-Step Guide to Applying Textured Finishes
Start by preparing the surface you’ll be applying the textured finish to. This is an essential step to ensure a smooth and long-lasting result. Begin by cleaning the surface thoroughly, removing any dirt, dust, or grease. Use a mild detergent and water, or a specialized cleaner if necessary. Allow the surface to dry completely before proceeding.
Next, inspect the surface for any cracks, holes, or imperfections. Fill these with a suitable patching compound, using a putty knife to level it out. Once the compound is dry, sand it down to create a smooth and even surface.
Now, apply a primer to the prepared surface. This will help the textured finish adhere better and provide a consistent base for the final result. Follow the manufacturer’s instructions for application and drying times.
Once the primer is dry, it’s time to apply the textured finish. There are various techniques and tools you can use, such as a trowel, roller, or brush, depending on the desired texture. Experiment with different patterns and strokes to create the look you want.
Allow the textured finish to dry completely before applying any additional coats or finishes. Follow the manufacturer’s instructions for drying times and recommended number of coats.
Creative Ideas for Textured Wall Designs
Looking to add a unique touch to your walls? Explore some creative ideas for textured wall designs that will make your space stand out.
From using unique textured wall techniques to incorporating natural elements, there are endless possibilities to create a visually appealing and textured look.
Let your imagination run wild and transform your walls into a work of art.
Unique Textured Wall Techniques
To achieve a truly unique and captivating textured wall design, explore these creative ideas that will transform your space into a work of art.
– Stenciling: Use stencils to create intricate patterns on your walls. From floral designs to geometric shapes, stenciling allows you to add depth and dimension to your space.
– Layering: Experiment with layering different textures and colors to create a visually stunning effect. Combine materials like plaster, wood, and fabric to create a one-of-a-kind look.
– Texture with paint: Use paint techniques like sponging or ragging to add texture to your walls. These techniques create a subtle yet interesting effect that will make your walls stand out.
– Mixed media: Incorporate different materials such as glass, metal, or even recycled materials to create a unique textured wall. This mix of textures will create a visually striking focal point in your space.
Incorporating Natural Elements
Incorporate the beauty of nature into your textured wall designs for a captivating and organic aesthetic. By using natural elements, you can create a unique and visually appealing space that brings the outdoors inside.
Consider incorporating materials such as reclaimed wood, stone, or even dried plants and flowers. Reclaimed wood can add warmth and texture to your walls, giving them a rustic and earthy feel.
Stone, on the other hand, can provide a more refined and elegant look, adding depth and character to your space.
Dried plants and flowers can be pressed onto the walls, creating a delicate and whimsical effect.
Whether you choose to use one natural element or combine several, incorporating nature into your textured wall designs will surely create a stunning and inviting atmosphere.
Maintenance and Care for Textured Wall Finishes
Maintaining and caring for textured wall finishes is essential to keep them looking their best and prolong their lifespan. By following a few simple maintenance tips, you can ensure that your textured walls remain in excellent condition for years to come.
Regular cleaning: Dust and dirt can accumulate on textured walls, so it’s important to clean them regularly. Use a soft brush or a vacuum cleaner with a brush attachment to remove any loose dirt or debris. Avoid using abrasive cleaners or harsh chemicals that can damage the texture.
Touch-up repairs: Over time, textured walls may develop small cracks or chips. It’s important to address these issues promptly to prevent further damage. Use a small amount of joint compound or spackle to fill in any cracks or holes, then gently sand the area until it’s smooth. Finally, repaint the repaired area to match the rest of the wall.
Protect from moisture: Moisture can be a textured wall’s worst enemy. To prevent water damage, make sure your walls are properly sealed with a water-resistant paint or sealer. If you notice any signs of water damage, such as peeling paint or bubbling texture, address the issue immediately to prevent further damage.
Avoid excessive force: Textured walls can be delicate, so it’s important to handle them with care. Avoid using excessive force when cleaning or moving furniture near textured walls to prevent accidental damage.
Frequently Asked Questions
Are Textured Wall Finishes Only Suitable for Certain Types of Walls or Can They Be Applied to Any Surface?
Textured wall finishes can be applied to any surface, not just certain types of walls. They’re a versatile option that can add visual interest and depth to any room. Whether you have drywall, plaster, or even concrete walls, textured finishes can be applied to create a unique and textured look.
From smooth textures to more rough and rustic finishes, the possibilities are endless. So go ahead and explore different textured wall finishes to find the perfect fit for your space.
Can Textured Wall Finishes Be Painted Over if I Decide I Want to Change the Color in the Future?
Yes, you can definitely paint over textured wall finishes if you decide to change the color in the future. Whether it’s a smooth or rough texture, you can simply apply a new coat of paint to freshen up the look of your walls.
Just make sure to properly prepare the surface by cleaning and priming it before painting. This will ensure that the new paint adheres well and gives you a smooth, beautiful finish.
Are There Any Specific Tools or Equipment Required for Applying Textured Wall Finishes?
Are there any specific tools or equipment required for applying textured wall finishes?
Yes, there are. To achieve the desired texture, you’ll need tools such as a trowel, a texture brush, or a roller.
Additionally, you may require a ladder or scaffolding to reach higher areas of the wall.
Other supplies like joint compound, sandpaper, and painter’s tape might also be necessary.
These tools and equipment will help you create beautiful and visually interesting textured wall finishes.
How Long Does It Typically Take for Textured Wall Finishes to Dry and Cure Completely?
It typically takes textured wall finishes a certain amount of time to dry and cure completely. The exact duration can vary depending on factors such as the type of texture and the environmental conditions. However, on average, it can take anywhere from a few hours to a few days for the textured finish to dry.
It’s important to allow enough time for proper drying and curing to ensure a successful and long-lasting result.
Can Textured Wall Finishes Be Applied in High Moisture Areas Such as Bathrooms or Kitchens?
Yes, textured wall finishes can be applied in high moisture areas like bathrooms or kitchens. These finishes are designed to withstand moisture and humidity, making them suitable for such environments.
However, it’s important to ensure proper ventilation and moisture control to prevent any issues with mold or mildew.
Additionally, using a high-quality primer and sealer can further protect the textured wall finish from moisture damage.
Conclusion
So why settle for plain and boring walls when you can create visual interest with textured wall finishes?
By adding texture, you can transform any space into a unique and visually appealing environment.
Whether you choose to use popular techniques like stucco or faux finishes, or opt for more creative designs, textured walls are a great way to enh internet ance the aesthetics of your home.
With proper maintenance and care, your textured wall finishes will continue to impress for years to come.

